

DNS_PROBE_FINISHED_NXDOMAIN is probably the most common error occur on the site. DNS stands for “Domain Name System”. This helps direct traffic on the internet by connecting domain names with actual web servers. Sometimes the site is not loaded even if the URL is written right. And there is no issue of internet connection as well.
DNS is responsible for handling the process of translating a domain name into an IP address. Websites have their own unique IP address, “123.123.12.1” is an IP address of a site. This DNS is like phone book of internet. But a user really do not need to type or remember the IP address. You can find the site by typing its user friendly name or URL.
In this article we are trying to explain how you can fix DNS_PROBE_FINISHED_NXDOMAIN in Google Chrome browser. If you want to know how to fix DNS_PROBE_FINISHED_NXDOMAIN in desktop and mobile we have a new guide for that.
We would share some methods with you, to fix this issue.
1. Check the URL
The very basic mistake that could be cause of DNS_PROBE_FINISHED_NXDOMAIN is wrong URL. So you must check domain name carefully to make sure that there is no typographical error in that. By doing this you can further save your time in finding solution for the error.
2. Restart Your Computer or Device
One more simple and easy way to fix this error is to shut down or restart your device. This is helpful while using tablets or mobiles. Sometimes its not easy to restart the device while you are working on a number sites. But restarting your device will clear many temporary cache and help you to load your site.
3. Reset Chrome Flags
Sometimes you install new features or extensions on Chrome which cause change in chrome’s settings. This could be one of the reason of DNS_PROBE_FINISHED_NXDOMAIN error. To fix this you must change the chrome settings to its default.

Type chrome://flags into your browser and select Reset all to default. After this restart your browser to see the result.
4. Release and Renew IP Address
Normally client side DNS problems or complains are seen in this error. The most important thing you must do is to renew your IP address. You would clear your DNS cache for this purpose as well. This method is similar to clearing browser cache.
This method varies for Windows and Mac so we would discuss them separately.
Windows
- First go to the start button, there search and select the Command Prompt.
- By clicking right you will see Run as administrator, select that now.
- There you would type cmd and then press Enter.

- By typing the following command and then clicking the enter button, you can release your IP address.
ipconfig/release- To show complete IP configuration for all your adapters type this command and press enter
ipconfig/all- This command will help you to flush your all local DNS cache and you will see Successfully flushed DNS resolver Cache at the end.
ipconfig/flushdns- The following command will renew your IP address. Type the code and press enter. This will renew configuration settings for all adapters.
ipconfig/renew- To rest your IP settings and Winsock catalog type these:
netsh int ip set dns
netsh winsock reset
After completing the above process step by step you would restart your computer.
Mac
- First go to System Preferences and here go to Network icon.

- select Advanced after clicking network icon.

- Search for the TCP/IP tab and click Renew DHCP Lease button.
- At the end press OK and restart your device.
5. Flush DNS Cache
Flushing your DNS Cache is one of the solutions to fix the error. Stored IP addresses of websites that you have visited are removed. Outdated IP addresses can cause the error.
- First go to the start button, there search and select the Command Prompt.
- By clicking right you will see Run as administrator, select that now.
- When the new window opens, type there this command:
ipconfig/flushdns- Click Enter at the end.
- Restart your browser to see the result.
6. Restart DNS Client Service
There are three ways to restart DNS client service on windows.
Windows Command Prompt
Follow these steps:
- By clicking the Windows logo key and R, Open the Command Prompt.
- Now type cmd and press Enter.
- Type the following commands step by step:
net stop dnscache
net start dnscache
The first command will stop your DNS server and the second one will start it again.
Output
These output commands show that you are done with first stopping and then again starting of DNS.
The DNS Client service was stopped successfully.
The DNS Client service was started successfully
Windows Services Manager
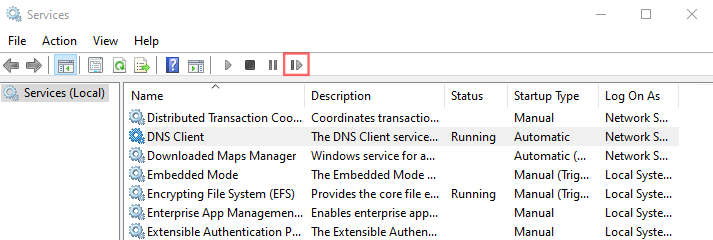
Follow these steps to fix the error by Windows services manager:
- Search bar will show you Services option.
- By scrolling down you will find DNS Client option there.
- Select Restart button from further options.
Windows System Configuration
- Press the Windows logo key and R, then type msconfig in your search bar.
- Select the Services option and find there DNS Client option.
- Now uncheck the DNS Client option in the list.
- Select OK and Restart it now.
- You will repeat first two steps but this time you will not uncheck the DNS Client option. But check the DNS Client option.
- Restart the device now.

7. Temporarily Disable VPN and Antivirus
VPN and Antivirus are helpful for security of your devices but sometimes these applications become a hurdle in your way to access a website. This is the reason of DNS_PROBE_FINISHED_NXDOMAIN error. At this point you should temporarily disable VPN and Antivirus.
To fix the issue simply follow these steps:
- Go to the software in your device’s applications and programs.
- Then there right click on it.
- Select the option of disable and press Enter.
After disabling VPN and Antivirus check if the error is fixed or not.
8. Check Local Hosts File
Every device have local files in it. These files map your domain names to its IP addresses. Whenever you search for sites your computer first refer you to the local files recorded in your device. This leads your device to DNS_PROBE_FINISHED_NXDOMAIN error.
Windows
Follow these steps to fix the error:
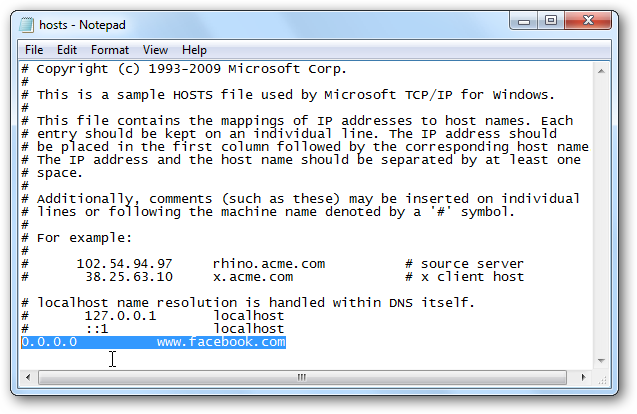
- Go to the search bar and type there Notepad(or any text editor).
- Select there Run as Administration by clicking right.
- Click File -> Open and then type there following:
%SystemRoot%:\Windows\System32\Drivers\etc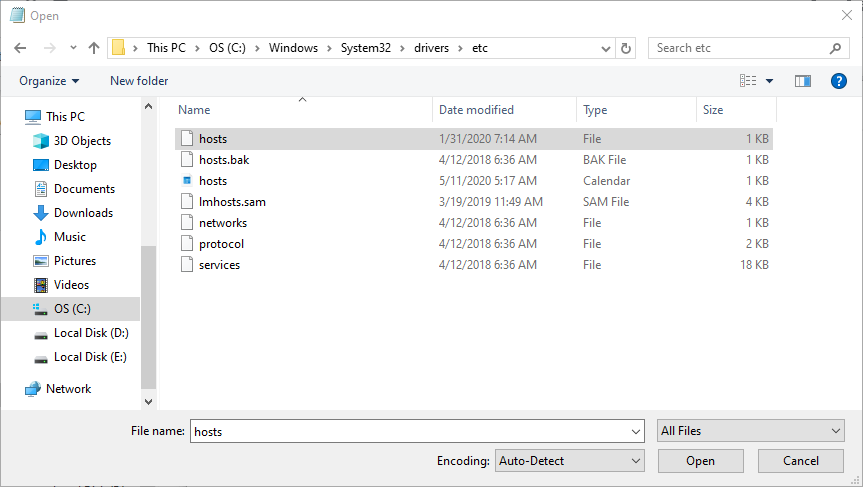
- Now search there for the host file. Double click on it and open the file.
- If the domain name and IP address of the website are there, remove them.
- Save changes and make it sure, the file which you are searching is not there.
Mac
Some steps to fix the error on Mac:
- Go to Launchpad and open your Terminal there.
- Press Enter after typing this command:
sudo nano /private/etc/hosts- You will go to the host file after inputting your password.
- Now remove inaccessible site and save changes.
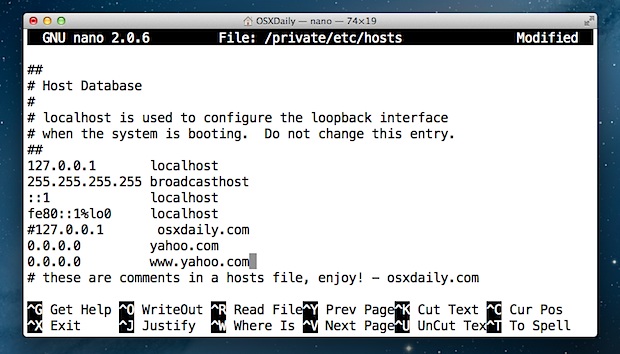
- Press Control and O to save changes on Mac.
9. Change DNS Servers
Something useful that you can try is to change your DNS Servers. Your device uses DNS provided by your internet service provider. DNS servers are linked to your ISP. Temporarily change these to a public DNS server like Google DNS or Open DNS. You change DNS to fix the error.
Windows
- By clicking the Windows logo key and R, Open the Command Prompt.
- Now type Control Panel and press enter.

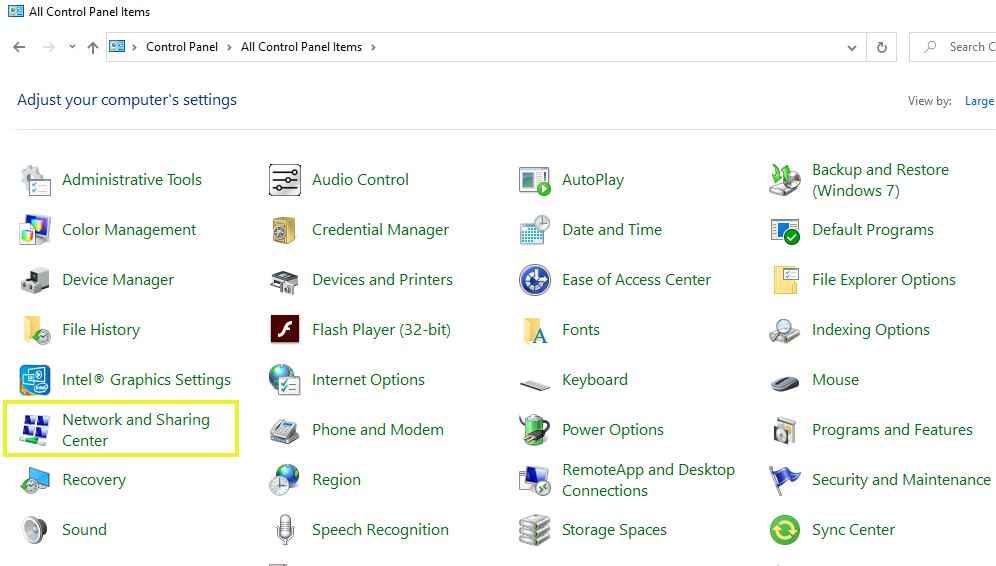
- Then go the Network and Internet.
- Now open here Network and Sharing.
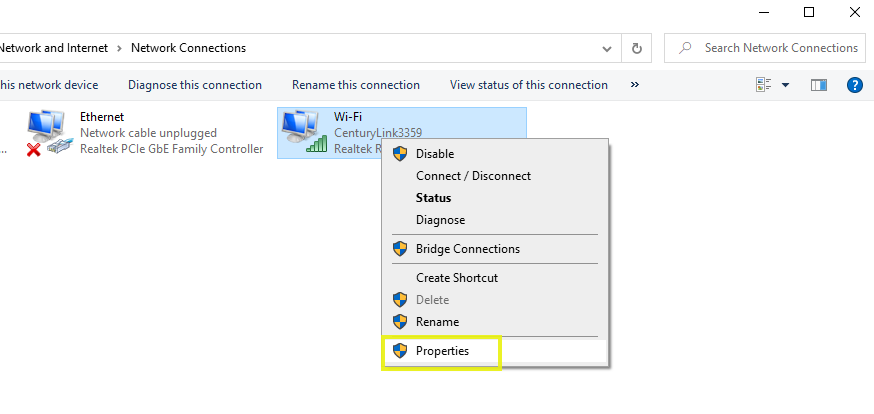
- Select Change adapter settings from the left side.

- Now right click on your connection and select properties from there.
- Select Internet Protocol Version 4 (TCP/IPv4) from the options and press Properties again.
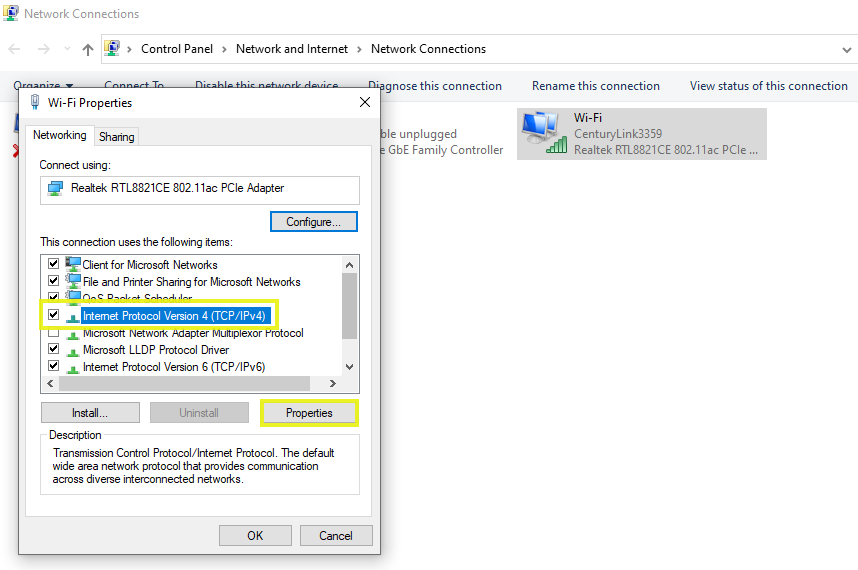
- Go to General, click Use the following DNS server addresses.
- Replace the existing IP addresses with these commands for Google DNS and Open DNS respectively.
8.8.8.8
8.8.4.4
208.67.220.222
208.67.222.220
- Press OK to save changes.
- Restart your browser.
Mac
- To change DNS servers simply go to System Preferences.
- Click on the Network icon and then select Advanced.

- Click the DNS tab here.
- Press the + button and type in the new DNS server.
- Press OK and save changes at the end.
